A healthier and allergy-free recipe for the iconic cream-filled golden snack cake. Homemade Copycat Gluten-Free Vegan Hostess Twinkies! These sweet little sponge cakes are easy to make, kid-friendly, sugar-free, and won't last forever! They're a great dessert or nostalgic lunchbox treat!

No more crying now! If we can all have Twinkies and feel good about eating them, I think we'll all be able to have a few more moments of joy throughout our weeks! What do you think? I thought it was time for some healthier gluten-free, vegan, and allergy-free Hostess Twinkies! Homemade copycat versions of our favorite snack cakes are not only fun to make, but delicious and essential for "sweet treat inclusivity"!

How do you make homemade Twinkies?
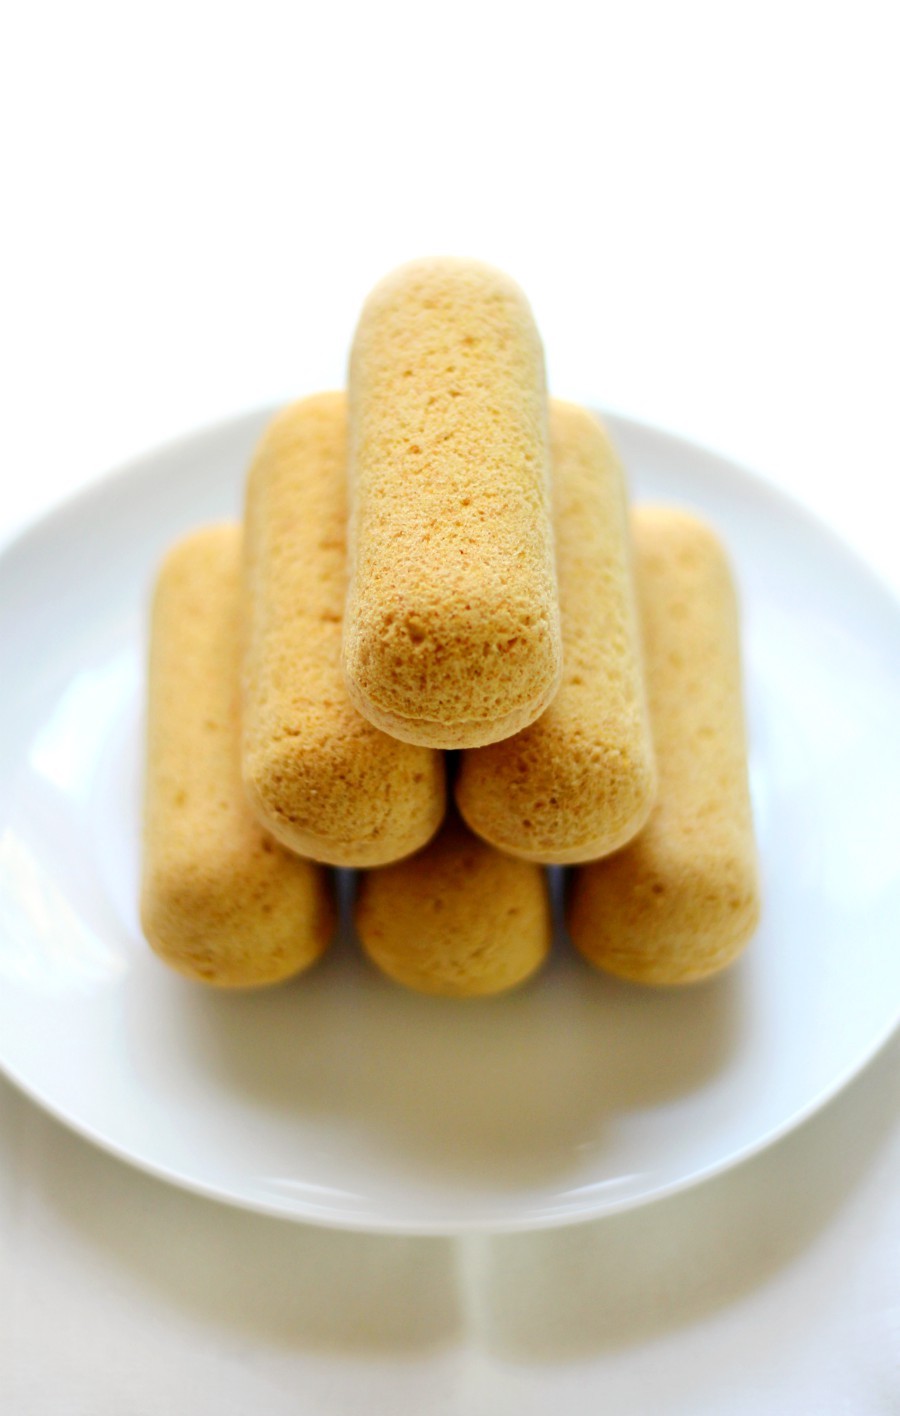
That's the big question, isn't it? To make your own homemade, iconically shaped, cream-filled golden sponge cakes, you'll need a special pan! Not just any pan, but a Twinkie pan! I bought this Wilton brand pan, but Hostess actually makes their own Twinkie pan with a pastry bag and "secret" recipe booklet. The Wilton one is cheaper (but bigger!) and you don't need all the bells and whistles of the name brand. Go generic! The special rounded-mini loaf molds will bake the cakes perfectly and from there, you just need to fill the cakes using a decorating/frosting gun.
Tips for baking and filling homemade Twinkies:
- Do NOT over-fill your Twinkie molds. They will overflow and you will end up with a sad Twinkie mess to clean up (*not* speaking from experience). You only need to fill the molds about ¾ full with the cake batter.
- If you want to get rid of the rounded bottom of the cake so it's flat, you can use a knife to shave off the rounded bottom a bit before you fill the cakes with cream.
- If you want super yellow cakes you can add more turmeric. I use turmeric since these homemade Twinkies are all natural. You don't taste the turmeric. Of course, you're free to use yellow food coloring too.
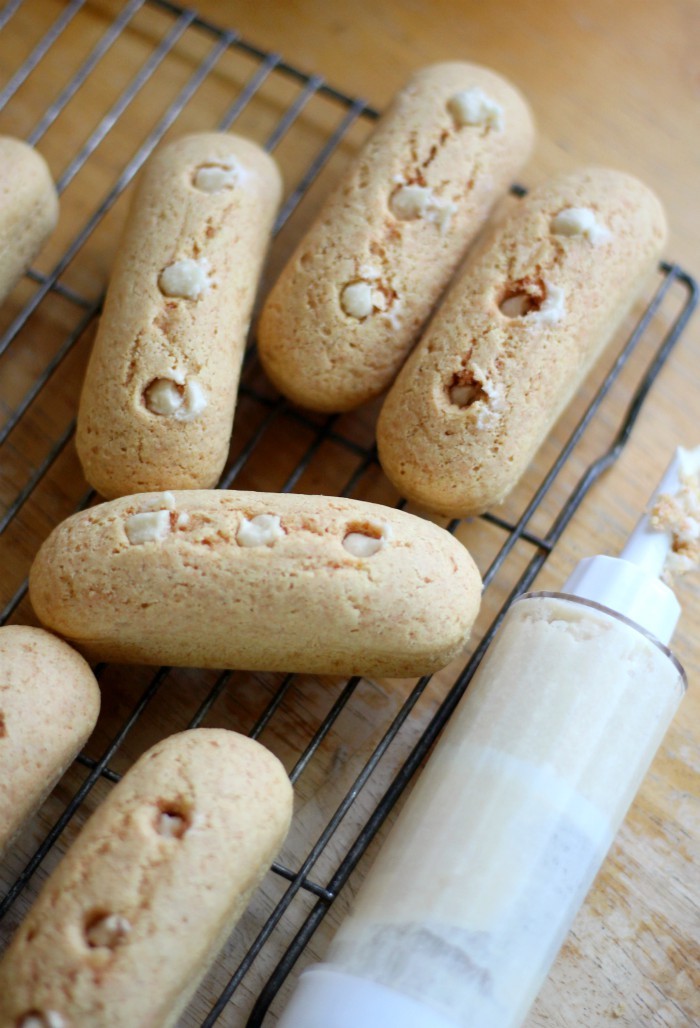
- Don't over-fill your Twinkies with cream. Authentic Twinkies have 3 holes in the bottom where the filling is injected. You'll be doing the same, just don't get "trigger" happy and over-fill, making your Twinkies explode. Fill the Twinkies slowly and you can always add more cream!
- With that in mind, don't poke a hole all the way through your Twinkie when filling with they pastry gun! Just go about halfway up.

Do Twinkies last forever?
While real Hostess Twinkies may have an indefinite shelf-life, these homemade Twinkies will not last forever. Sorry. For best results, I suggest storing the homemade Twinkies in the fridge. Anytime I make a recipe that calls for homemade vegan buttercream filling, I feel better storing them in the fridge and remaining chilled. They'll last much longer than out at room temperature.
Other Twinkie fun facts:
- Hostess Twinkies were invented in the 1930s. Hostess went bankrupt in 2012 and Twinkies ceased to be produced. But, because this is America, Twinkies came back a year later in 2013 and now they're thriving.
- Twinkies were initially banana flavored, but bananas were rationed during WWII, so vanilla was used instead. Over the years there have been various fruity flavored Twinkies, like strawberry, and in 2005, the banana flavor was reintroduced and become popular enough that by 2007 it was back in production.
- When Twinkies came back in 2013, the size of the Twinkie was reduced and subsequently contained fewer calories. They went from 150 calories to 135 calories per cake.
- Hostess claims that Twinkies do not last forever. The original Twinkie (before 2013) lasted 26 days. The new, smaller Twinkies lasts 45 days. Take that as you will.
Are Twinkies a dessert or a snack?
With any "snack cake", it all depends on personal preference. Considering Twinkies are such an iconic lunchbox staple, thinking of them as a sweet snack is fitting, but I guess you can classify them as a lunchtime dessert? If you think about it long enough it just gets confusing and you start questioning your values. The best thing to do is not think about it too much and just enjoy that first soft, creaming, sweet snack cake bite! These allergy-free, gluten-free, vegan homemade Twinkies are a 100% healthier option than the real Hostess Twinkie so that means you can feel good about grabbing one for your own afternoon pick-me-up and putting one in your kid's lunchbox! Win, win!
Homemade Copycat Gluten-Free Vegan Hostess Twinkies

Homemade Copycat Gluten-Free Vegan Hostess Twinkies (Allergy-Free)

A healthier and allergy-free recipe for the iconic cream-filled golden snack cake. Homemade Copycat Gluten-Free Vegan Hostess Twinkies! These sweet little sponge cakes are easy to make, kid-friendly, sugar-free, and won't last forever! They're a great dessert or nostalgic lunchbox treat!
- Prep Time: 10 mins
- Cook Time: 15 mins
- Total Time: 25 mins
- Yield: 12 1x
- Category: Dessert, Snack
- Cuisine: American
Ingredients
- Yellow Cake:
- 2 Cups Gluten-Free All-Purpose Flour
- ¾ Cup Granulated Erythritol (or preferred granulated sweetener)
- 1 Prepared Bob's Red Mill Egg Replacement
- 1 ¼ Tsp Baking Powder
- ½ Tsp Turmeric
- ¾ Cup Unsweetened Non-Dairy Milk
- 1 TB Neutral Oil
- 1 Tsp Pure Madagascar Bourbon Vanilla Extract
- Cream Filling:
- 1 ¼ Cup Powdered Erythritol (or preferred powdered sweetener)
- 1 Stick Vegan/Soy-Free Butter (I use MELT)
- 1 Tsp Pure Madagascar Bourbon Vanilla Extract
Instructions
- Preheat the oven to 375°F.
- In a large mixing bowl, combine all dry cake ingredients (up to the non-dairy milk) and whisk together.
- Now add in the liquid ingredients and mix well to combine and form a smooth cake batter.
- Grease a 12-cavity Twinkie pan and fill each mold ¾ full with your cake batter.
- Bake the cakes in the preheated oven for 15 minutes. Remove and let cool in the Twinkie pan for 5 minutes before removing and transferring the cakes to a wire rack to cool completely.
- To prepare the cream filling, mix together the powdered sweetener, softened butter stick, and vanilla.
- Fill a pastry gun with the cream filling and use the long filling tip to fill the flat bottoms of the cooled Twinkies in three, spaced out, spot.
Nutrition
- Serving Size: 1

And that, my celiac and food allergic friends, is how you make free-from homemade Twinkies! I think the real reason these homemade Twinkies won't last long is that fact that they are delicious! Bring on the nostalgia! While you're at it, why not bake up more Hostess copycats? The classic chocolate Hostess cupcake has always been a favorite of mine and bonus, they don't require a special pan!
So tell me:
+ What was your favorite Hostess treat?
———————————————-
Stay connected: Facebook: Strength and Sunshine Twitter: @RebeccaGF666 Instagram: rebeccagf666 Pinterest: RebeccaGF666 Bloglovin’: Strength and Sunshine
Toni
I would love to give it a try!! Perfect for me and my kids!
Rebecca @ Strength and Sunshine
Bring on some nostalgia!
Alexandra @ It's Not Complicated Recipes
So clever! I am definitely keen to try this soon - how fabulous this is a gluten free option 🙂
Rebecca @ Strength and Sunshine
Have you ever had a Twinkie?
Alexandra
Never, but I have heard so many good things about them! And I love the sound of them 🙂
Linda
This is a fun recipe to try! I love twinkies and can't wait to share these over tea.
Rebecca @ Strength and Sunshine
Haha, I think you're the only person who eats Twinkies with tea!
Helen
Yum! You're so creative! These look awesome.
Rebecca @ Strength and Sunshine
Thank you, Helen!
La Shell Reid Hoilett
I love love love twinkies! Can't wait to try these out!
Rebecca @ Strength and Sunshine
They sure bring out the smiles!
ivana
This looks so yummy and easy to make .. Thanks for sharing the recipe xo
Rebecca @ Strength and Sunshine
I'm glad you think so!
Indya | The Small Adventurer
As an Australian, Twinkies are not the staple treat over here that they seem to be elsewhere, and as someone who recently had to cut out gluten, I assumed I'd never be able to try one - but now I can! Definitely bookmarking these to make in the future. Thanks for the recipe!
Rebecca @ Strength and Sunshine
I bet, go order a Twinkie pan first!
Lori Geurin
Woah - Gluten-free Twinkies with turmeric?! I would so eat these! Thank you for the healthier recipe. I can't wait to try it!
Rebecca @ Strength and Sunshine
Turmeric is just for color.
Tessa Christianson
Oh. my. goodness!! I was actually talking about twinkies the other day with my sister as we reminisced about the snacks we will *never* eat again. I guess we were dead wrong because I am with her right now AND we have all the ingredients on hand to make these! Thank you thank you!
Rebecca @ Strength and Sunshine
Whoop! A life without Twinkies would be too sad...we all need our Twinkies!
Sreya Gupta
Wow! It seems yummy. I must try this out soon. Pinning it.
Rebecca @ Strength and Sunshine
I hope you enjoy!
Dorothy at Shockingly Delicious
It's so interesting to see your tricks for making these allergy free. Well done!
Rebecca @ Strength and Sunshine
Thanks!
Annaliese
YUM!! I had a Twinkie baking kit when I was a kid- this recipe makes me wish I still had that pan!
Rebecca @ Strength and Sunshine
Haha, ah! Girl, then you're already experienced, haha!